Switches | Outlets & Plugs | Ballasts | Replace Ballasts | LED Tube Lights | Troubleshooting | Basic Electricity | Misc Articles
Rewire a Lamp Instructions
These instructions will show you how to replace a cord. Whether you want to replace the socket, the switch, the cord, or everything in the lamp, the following instructions will cover these topics.
Some lamps have a felt cover to protect against scratches. If you are replacing the whole socket assembly you will need to remove this felt cover in order to access the threaded pipe inside the lamp. You can do it yourself using a hot glue gun.
Tool List
- Screwdriver
- Wire stripper
- Wire cutter (optional)
- Electrical tape
- Continuity tester
- Make sure the lamp is unplugged. After removing the shade and the bulb, remove the harp. This is done by lifting the fasteners to the top of the harp. Squeeze the harp and lift up from the base. Metal sockets have a cardboard insulator to protect against shock.
- Pull upward on the cover and tilt slightly. Here you can access the cord and the switch. Plastic socket covers can be unscrewed from the base. Pull the cover and insulator from the socket, you can see the insulator inside the cover. Note the terminal colors on the switch. Brass is for the line wire, silver is for the neutral.
- Cut the old cord and split the wires apart. You may need a wire cutter to split the cord. Strip about an inch of insulation from both wires on the old and new cords. Twist the wires and bend them into a hook. Hook each of the old and new wires together and then twist the wires to splice them together.
- Once they are twisted together, pull on the wires to make sure they hold together. Cut a short piece of electrical tape and wrap the wire splice. When wrapping, overlap the tape by half of the width of the tape. Wrapping too much tape will make the wires too big to fit through the holes. Cut off any excess tape.
- Pull the new cord into the lamp. Push the cord at the bottom as you gently pull from the top. Pull the rest of the cord up and cut below the splice. Split the new cord and then pull it apart (you may need a wire cutter). Check the cord for polarity markings. The neutral wire (which connects to the wider prong on the plug) usually has ribs on the side of the insulation. The line side sometimes has lettering.
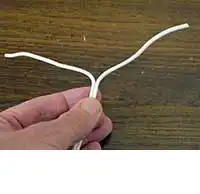
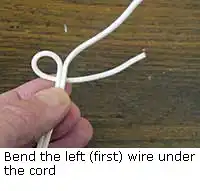
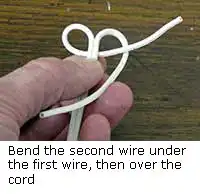
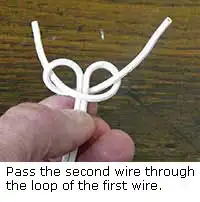
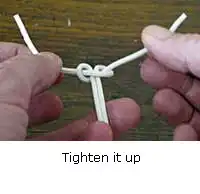
- Tie an Underwriters knot in the cord. First you bend the left wire under the cord. Bend the other wire under the first wire, then over the cord, and through the loop of the first wire. Next you tighten it up. Push it back into the socket base and tighten it again. See photos.
- Trim and strip the wires. Trim them as short as possible and still be able to strip them. There is not much room under the socket. If the wires are stranded, twist the wires so they don't spread when you tighten the screw. Bend the wires so they wrap clockwise around the screws. The neutral wire (usually ribbed) connects to the silver colored terminal. All of the strands of the wire must be under the screw when you tighten it.
- Replace the cover and insulator. Make sure the cardboard insulator is seated all the way into the base.
- Test continuity between the plug and the socket tab. With a continuity tester, touch one lead to the smaller prong of the plug (which is the line prong). Touch the other to the bottom center tab inside of the socket (which is the line tab). Continuity will indicate proper wiring.
- Replace the harp, install the bulb and the shade.
How to Tie an Underwriters (UL) Knot
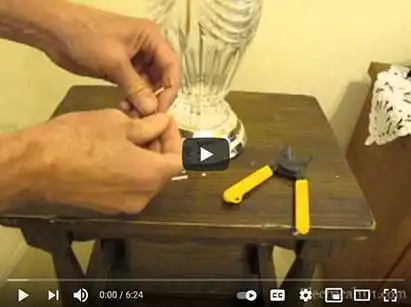
How to Rewire a Lamp Video
Replace a Ceiling Light Fixture
Rewire a Lamp Instructions
About Privacy Policy Sitemap Copyright © 2024 Electrical101.com Terms of Use